October 22, 2014

The fair was Awesome!!

 Hello everyone!! So yesterday was ladies' day at the Pensacola Interstate Fair, which means ladies (that's me!) don't have to pay admission. Apparently Cameron is a lady...

 Just kidding! We had to pay for him. But he's worth it right? *awkward silence* Okay moving on.
 So this is the Skyflyer. You get in a two person swing, then it goes up really high and spins around. It doesn't spin too fast so it's only the height that was at all scary for me. Not saying I'm scared of heights or anything... *clears throat*
 This is the Ferris wheel. There was actually 2 or 3 but we chose this one because it was closer to most of the rides we did.
Here's me and Meredith by the Skyflyer. See, I told you that Ferris wheel was by most of the rides we did.                                           
 This is a picture taken from up in the Ferris wheel. It was kind of scary how creaky it was. I t sounded like it might break at any second.
 This is a sunset picture taken from the Ferris wheel as well. Meredith timed it just right so we'd go up in time to get sunset pictures.
 Another Ferris wheel picture...
 Sunset picture...
 My favorite Ferris wheel picture...
 Meredith, looking stunning as always...
 Here you can see the Skyflyer (the tall glowing pole) taking people up. It's higher than it looks.
 Me and Cameron on the Ferris wheel. His ear is GLOWING.....
 This is a picture taken by a ride where you go upside-down, which was absolutely TERIFYING!!!!!!! But also a lot of fun....
Me trying to figure out if I'm tall enough. Oh, I was never any good at math...
 I THINK Meredith's tall enough... right??
 Peace out, home.... Meredith.....
 I think the ride is going in this picture. It was called the Himalaya, and it went really fast, so naturally we had to go on the SUPER Himalaya too...
 Me looking like I might throw up (which thankfully I did not) while Cameron's hoodie logo glows...
 Meredith and her friend Hannah looking FABULOUS!!
 Here's the Ferris wheel again...
 Me and Cam about to go up in the Skyflyer... stay fierce!
 Cameron got a LITTLE crazy...
 Don't we look adorable *awkward chuckle*
 There we are way up high! We're in the orange one in front of the yellow.
 Fair food is soooo healthy!! Pay attention Meredith!!
Here we are in the Ferris wheel again to finish off the night. Okay, so I may have gone on the Indy 500 again but that's not important...

So we went twice on the Claw, which doesn't quite go upside-down but is still terrifyingly awesome. I hope you enjoyed this blog post! All photo credit to Mom and Meredith. Peace out home Meredith!

October 7, 2014

DRAWING ROCKS!!!!!!

Hello! Today, instead of a craft tutorial, I'm going to show you a few of my drawings. The first 9 are from my very own sketch book. The rest are... well, not. And I'm sorry that some of the pictures are sideways, but there was nothing I could do *sniff sniff*.
 This is my sketch book. Awesome, right?
 Okey dokey, this is my coffee table and rainbow couch. Of course, you can't tell it's a rainbow, but it is. The pillows do have designs on them, but they were too complicated for me to draw.
 This is one end of my brown couch (full picture later...). This pillow also has a design, but, once again, it was too complicated to draw.
 This is a weird mix of my Barbie styling head and my creative mind.......
 This is my bookshelf. It was complicated to draw because either I had to take ALL the books off (and boy do we have a lot of books!) or estimate where the different lines should be. I ended up estimating, and it turned out pretty well...
 This is Calvin (from the comic Calvin and Hobbes) being his normal annoying self. Yet we all love him, am I right?
 This is a cross. I didn't feel like drawing the base, so there's some conveniently placed grass...
 This is a table... so yeah...
 This is a chair modeled after the ones in the dentist's office I go to.
 This is... BREAKFAST!!!!!!! Who doesn't love donuts and tea. And yes, it's tea, not coffee. Oh, and the phone is not for eating...
 This is Anna from Frozen. The flowers on the dress would have probably looked awful if I'd drawn them, so be thankful I didn't.
 This is a pony. His name is Sheldon...
 This is Toph (hopefully I spelled that right) from the show Last Airbender. If you haven't seen that show, go RIGHT NOW and watch it.
 This is the aforementioned brown couch. The throw blanket is a Thomas Kinkaid painting made into a blanket, so.....
 This is a girl... with an orange bow and dress...
 This is my stuffed puppy Prince. He's adorable.
 This is some random... thing. It slightly resembles a female human being, huh?
 And this is a strange mix of two people I know.
This is a close-up of the same drawing so that you can tell that I didn't just do thick black lines for her eyes...

Thanks for reading! If you have any requests/ideas for blog posts, there's a place to post comments(hint hint)...

September 8, 2014

Quadfish on Monster Tail

 Hi! Today I'm going to show you how to make the Quadfish bracelet on the Monster Tail loom from the creators of Rainbow Loom.
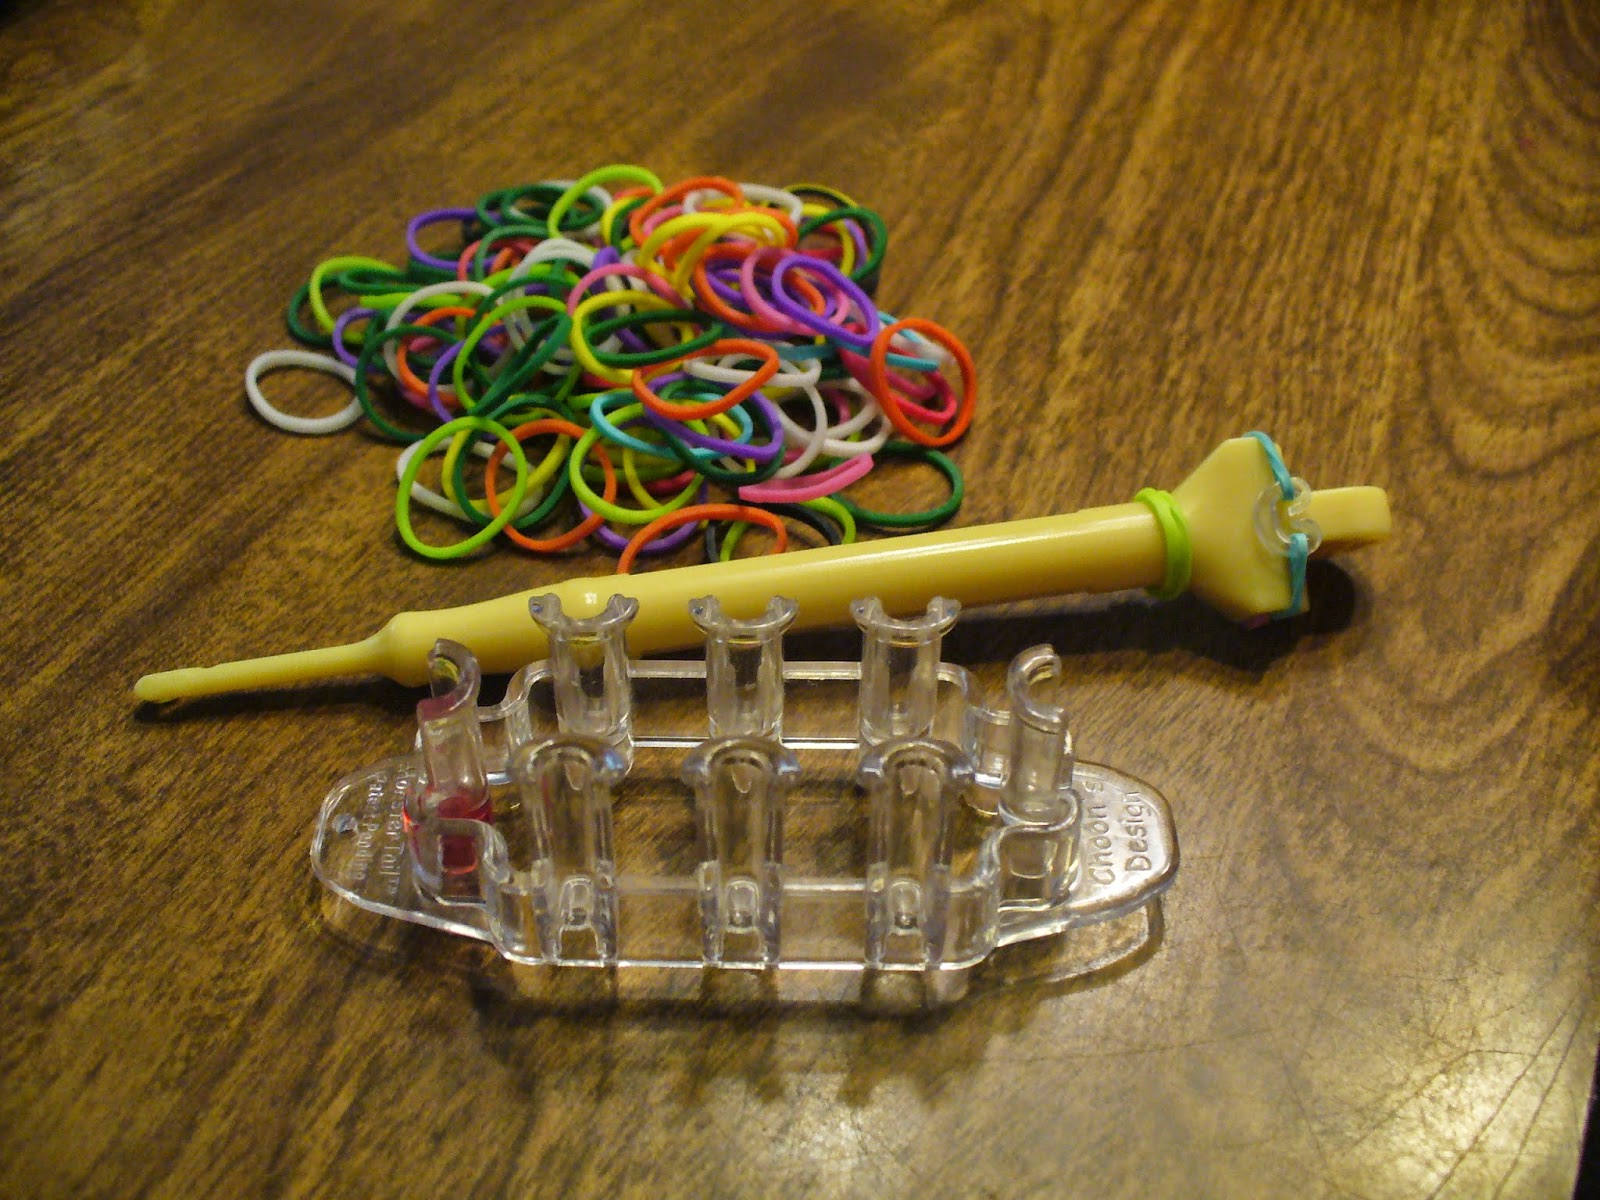
 You will need: A Monster Tail loom, a hook (like the one in the picture below. You can buy one at a craft store, and they also come with the Rainbow Loom/ Monster Tail), and approximately 100 rubber bands (the ones sold specifically for these looms).
 Take your Monster Tail out of the box and place it so that the red dot (which is on the left in this picture) is on the right.
 Now place your first band (for me it's black) in a figure eight across two pegs.
 Then do the same thing on the one beside it.
 Now take your next color (for me it's green) and place it horizontally from the bottom right peg to the one above and to the left of it.
 Then do the same, but from the bottom left to the one above and to the right if it to make and X.
 Take your next color (for me it's pink) and place it on the two right pegs.
 Do the same on the left.
 Now, using your hook, grab the very bottom left rubber band and hook it over into the center.
 Do the same to the right.
 Now flip your Monster Tail and do the same on the other side.
 Turn it back so the red dot is on the right.
 Then do the X again with your next color (for me it's teal).
 Using your hook again, hook over the very bottom bands.
 Now add the straight up and down bands...
 Hook the very bottom bands over...
 And continue this for a while. Soon it will start to come out the bottom like this:
 And then eventually it will be the correct length. You can measure it along the way, but for me, it needs to be about 50 long (that's 100 bands). It may be shorter or longer for you.
 Once you've added your last band and hooked over the bottom bands, instead of adding more bands...
 Just hook over the bottom one again so there's only one layer.
 Now take the bottom left band and hook it up to the top like this:
 Do the same on the other side.
 Then hook the bottom half of the band over the top, like this:
 Do the same on the other side.
 Now take a C- or S-Clip (I'm using a C-Clip)...
 And attach it to one side like so...
 Then with the one side still attached, take it off the peg and attach it to the other side.
Then take it off the loom. It should look like this:
 Flip the bracelet around and pull two of the bands on this end so the loops are larger than the others...
 Now, go back to the end with the C-Clip and pinch it like this. This is not require, but it makes it easier to attach the other end.
 Now take the two big loops on the other end and attach them to the C-Clips like this:
 And you're done!!
Here's what it looks like on:
These bracelets make great gifts, or just bracelets for you to wear!! They're super cute and stylish, and would also make good friendship bracelets. If you try this craft, I hope that it turns out well, and happy back to school! Wait... what am I saying? :)